5장 두번째 애플리케이션 - 트렐로
이번 장에서 다룰 내용
- 예제 트렐로 애플리케이션 소개
- Typescript 네임스페이스와 모듈
- Typescript 제네릭
- Angular 고급 컴포넌트
- Angular 생명주기 훅
트렐로 예제 애플리케이션 소개
실제 트렐로(일정관리와 협업을 지원하는 개발도구)의 축소 버전
애플리케이션 개요
- 작업리스트가 있는 보드를 만들고
- 보드마다 새로운 작업과 하위 작업을 추가 할 수 있음
기술 개요
- 컴포넌트를 추가하고 컴포넌트 간 데이터를 공유하는 방법을 실습
- 싱글톤 서비스를 사용하여 컴포넌트 사이에 공통으로 사용되는 데이터를 생성
Typescript 네임스페이스와 모듈
- Namespace(네임스페이스) : 내부모듈
- Module(모듈) : 외부모듈
유니버셜 네임스페이스
- Javascript는 모든 클래스와 함수를 window 네임스페이스에 추가(window는 현재 창과 관련된 모든 함수, 클래스를 포함하는 유니버셜 네임스페이스)
- 이러한 함수, 클래스는 웹애플리케이션의 모든 곳에서 접근이 가능
- 애플리케이션 규모가 커지면 하나의 네임스페이스 아래 모든 함수와 클래스를 사용하는 것이 좋지 않음
- 유니버셜 네임스페이스가 모든 함수와 클래스를 갖게 되면 충돌이 일어날 수 있음
- 같은 이름을 가진 클래스나 함수를 선언 할 수 없음
/* 자바스크립트 */
function getDate(){
	return true;
}
function getDate(){ //getDate 함수를 덮어 씀
	return false;
}
window.getDate(); // false가 출력됨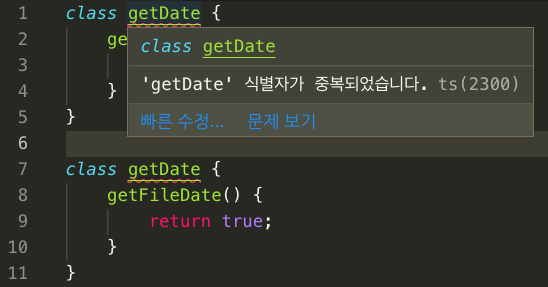
- 이런 문제를 해결하기 위해서 컨테이너(네임스페이스와 모듈)가 있음
- 컨테이너가 있으면 각 클래스나 함수가 컨테이너 안에서 캡슐화 되고 컨테이너 이름만 유니버셜 네임스페이스에 노출됨
Typescript 네임스페이스
- namespace 라는 키워드를 제공하여 관련 함수, 클래스와 인터페이스를 하나의 namespace 아래 캡슐화
namespace WebSeriveResponse{}- 네임스페이스 외부의 모든 사용자는 다음과 같은 점 표기법으로 접근 가능
«네임스페이스이름».«함수/클래스 이름»
- 네임스페이스 아래 정의된 모든 함수와 클래스는 네임스페이스 외부에는 표시 안됨
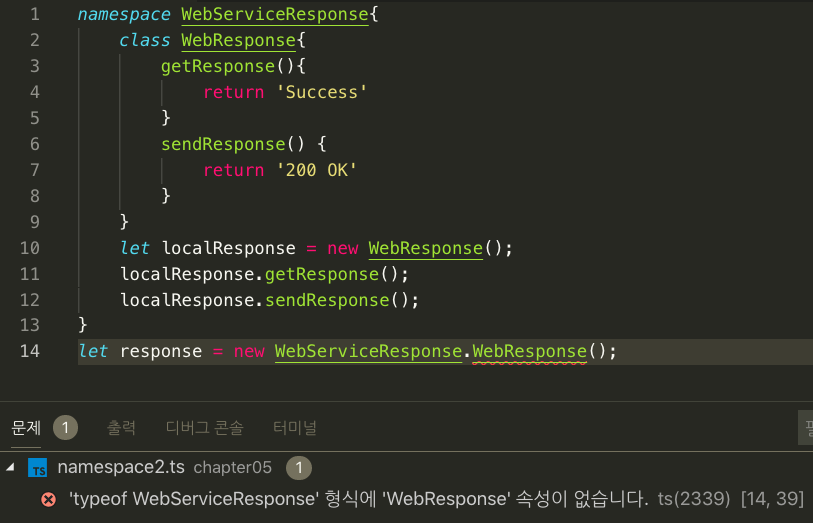
- 14행에서 WebServiceResponse에 WebResponse 속성이 없다는 Typescript 경고가 뜸
- 10행에서는 네임스페이스 내부이기 때문에 WebResponse 클래스에 엑세스 가능
export 키워드
- export 키워드를 사용하여 네임스페이스 내부의 특정 멤버를 외부에 공개할 수 있음
namespace WebServiceResponse{
	export class WebResponse{
		getResponse(){
			return 'Success'
		}
		sendResponse() {
			return '200 OK'
		}
	}
	let localResponse = new WebResponse();
	localResponse.getResponse();
	localResponse.sendResponse();
}
let response = new WebServiceResponse.WebResponse();
response.getResponse();
response.sendResponse();
중첩(nested) 네임스페이스
- 네임스페이스 안에 또 다시 네임스페이스를 추가하여 중첩된 캡슐화를 지원
- 외부에 노출되는 중첩 네임스페이스에도 export 키워드가 붙어야 함
- 특정 기능 테스트나 하위 기능 테스트에 유용
namespace WebServiceResponse{
	let url: string;
	export namespace ServiceResponse{ // 중첩 네임스페이스
		export class WebResponse {
			getResponse() {
				return 'Success'
			}
			sendResponse() {
				return '200 OK'
			}
		}
	}
	let localResponse = new ServiceResponse.WebResponse();
	localResponse.getResponse();
	localResponse.sendResponse();
}
let response = new WebServiceResponse.ServiceResponse.WebResponse(); // 외부네임스페이스.내부네임스페이스.내부클래스
response.getResponse();
response.sendResponse();
Typescript 모듈
- 모듈 장점 : 모듈로더를 사용할 수 있음, 비동기 동작을 제공, 결과적으로 애플리케이션의 속도를 높일 수 있음
- 사용가능한 모듈로더가 몇가지 있으며 구문과 관리 방법이 각각 다름
정의
- 모든 파일이 별도의 모듈이고 파일 이름이 모듈 이름
- 파일을 생성하여 모듈을 만들 수 있음
- 명시적으로 정의되지 않는 한 모듈 내부의 모든 컨텐츠는 캡슐화 되어 외부에서 접근 불가
- 다음과 같은 코드로 service.ts 라는 파일을 만들면 service라는 모듈이 만들어지고 다른 모듈에서 이 모듈을 참조할 수 있음
interface iBoardService{
	url:string;
	getBoardInformation();
}
class BoardService{
	url:string;
	getBoardInformation(){
		return '사용가능한 보드 없음';
	}
}
let boardService = new BoardService();
boardService.getBoardInformation();
모듈 export
- 모듈의 멤버를 공개하려면 export 키워드를 사용
- export를 사용하여 노출 시킬 멤버를 명시적으로 정의
export class BoardService{
	url:string;
	getBoardInformation(){
		return '사용가능한 보드 없음';
	}
}
모듈 import
- export 한 모듈을 사용하려면 명시적으로 다른 모듈에서 import 해야 함
import { BoardService } from './module/service';- 필요한 모듈만 선택적으로 import 가능
- import를 하면 로컬멤버와 마찬가지로 사용 가능
import { BoardService } from './module/service';
let board = new BoardService();
board.getBoardInformation();- import 하는 멤버를 편리하게 사용할 수 있도록 멤버의 이름을 변경 할 수 있음
import { BoardService as Service } from './module/service';
let board = new Service();
board.getBoardInformation();- import 할 멤버가 모듈의 export된 모든 멤버일 경우에는 별표를 사용하여 한번에 가져올 수도 있음
import * as Service from './module/service';
let board = new Service.BoardService();
board.getBoardInformation();
let interface: Service.iBoardService;
Tyescript 제네릭
- 함수 또는 클래스를 정의할 때 파라미터에 기대하는 타입을 명시적으로 정의하지 않고 실제 호출할 때 적절한 타입을 정의하는 개념
- 제네릭을 사용하면 재사용이 가능하고 일관성이 있는 컴포넌트를 만들 수 있음
- 복잡성을 낮추어 코드 관리의 부하를 줄일 수 있음
정의
- 함수 또는 클래스는 타입 파라미터를 사용하여 제네릭을 정의
- 타입 파라미터는 함수의 파라미터가 무엇인지 또는 클래스의 인스턴스가 어떤 타입이어야 하는 정의
- 타입 파라미터는 함수에 전달되는 일반 파라미터가 아니라 특별한 종류의 파라미터
- 함수 또는 클래스 이름 다음에 꺽쇠 괄호를 사용해 정의
- 일반적으로 타입 파라미터는 T로 정의하지만 단지 규칙일 뿐
- 함수 또는 클래스가 사용할 실제 타입은 해당 함수 또는 클래스 인스턴스를 호출할 때 정의
함수
- 함수에서 사용되는 타입을 지정하는 방법을 제외하고는 일반 함수와 매우 유사
/* 숫자를 입력 파라미터로 사용하여 해당 숫자를 배열에 추가 */
data = [];
pushNumberToArray(item: number){
	this.data.push(item);
}- 문자열을 동일한 배열에 추가 해야 하는 추가 요구사항이 생길 경우에는 문자열을 입력받는 또 다른 함수를 작성해야 함
pushStringToArray(item: string){
	this.data.push(item);
}- 새로운 요구사항이 생길 때마다 새로운 기능을 추가해야 함
- 모든 타입을 받을 수 있는 제네릭 함수로 만들수 있음
- 제네릭을 사용해서 가장 좋음 점은 호출자가 전송하려는 타입을 결정할 수 있다는 것
pushGenericToArray<T>(item: T){
	this.data.push(item);
}
this.pushGenericToArray<string>('10');
this.pushGenericToArray<number>(10);
클래스
- 제네릭 클래스도 일반 함수와 비슷하게 타입 파라미터를 사용
class GenericClass<T>{
	items: T[] = [];
	pushDate(val:T){
		this.items.push(val);
	}
	getDate(index:number):T{
		return this.items[index];
	}
}- T 타입 파라미터를 사용하여 클래스를 정의한 후
-
이것을 사용하여 items 변수를 정의
- 제네릭을 사용하면 여러 타입으로 사용 가능
- number 타입을 타입 파라미터로 사용하여 클래스 인스턴스를 생성
let numClass = new GenericClass<number>();
numClass.pushDate(10);
numClass.pushDate(20);
let num:number = numClass.getDate(0);- Typescript 컴파일러는 클래스 인스턴스를 만들고 인스턴스에서 함수를 호출할 때 해당 타입이 number임을 알게 됨
- pushDate 함수를 호출할 때 number이 아닌 다른 타입을 넘기려고 하면 컴파일러에서 오류 경고를 띄움
-
호출자가 타입을 정의하게 되므로 코드의 일관성을 유지
- 클래스를 사용하게 되면 다음 예제와 같이 사용자 정의 타입을 만들 수 있음
- Person 클래스를 새로 정의함
class Person{
	firstName: string;
	lastName: string;
}
let personClass = new GenericClass<Person>();
personClass.pushDate({ firstName: 'Homer', lastName: 'Simpeon' });
personClass.pushDate({ firstName: 'Marge', lastName: 'Simpeon' });
let person: Person = personClass.getDate(0);
제네릭 제약
- 너무 많은 제네릭의 사용은 코드가 일관되지 않게 동작할 수도 있음
1
2
3
4
5
6
7
8
9
10
11
12
13
14
15
16
class GenericClass<T>{
	items: T[] = [];
	pushDate(val: T) {
		this.items.push(val);
	}
	getDate(index: number): T {
		return this.items[index];
	}
	getSpecificItem(title:string):T{
		for(let value of this.items){
			if(value.title == title){
				return value;
			}
		}
	}
}
- 11행에 T 타입에 title 프로퍼티가 존재하지 않는다는 오류 발생
-
T가 어떤 타입이 될지 알 수 없고 모든 타입에 title 프로퍼티가 있는 것은 아니기 때문
- 이런 경우 제약조건을 줄 수 있음
- 특정 프로퍼티가 포함된 타입 파라미터만 받도록 하는 것
- 제네릭에서 제약 조건은 extends 키워드를 사용해 정의
1
2
3
4
5
6
7
8
9
10
11
12
13
14
15
16
17
18
19
interface ITitle{
	title: string;
}
class GenericClass<T extends ITitle>{
	items: T[] = [];
	pushDate(val: T) {
		this.items.push(val);
	}
	getDate(index: number): T {
		return this.items[index];
	}
	getSpecificItem(title:string):T{
		for(let value of this.items){
			if(value.title == title){
				return value;
			}
		}
	}
}
- 1행 title 프로퍼티가 있는 타입을 정의(예제에서는 인터페이스를 사용했지만 클래스를 사용해도 됨)
- 4행 인터페이스를 클래스 타입 파리미터에 제약 조건으로 추가
- 제네릭에 제약조건을 추가하면 보다 구체적으로 타입 파라미터를 정의할 수 있고 코드의 일관성이 향상
트렐로 예제 애플리케이션
- Typescript 모듈을 사용하여 코드를 작성하는 법
- Angular에서 제공하는 통신 기능 살펴보기
- 모델을 만들고 Observeble을 사용하면서 Typescript의 제네릭 사용법을 살펴보기
- Angular 컴포넌트의 생명주기에 대해 살펴보고 컴포넌트 생성과 소멸과정에서 사용자정의 기능을 추가하는 방법 살펴보기
애플리케이션 아키텍쳐
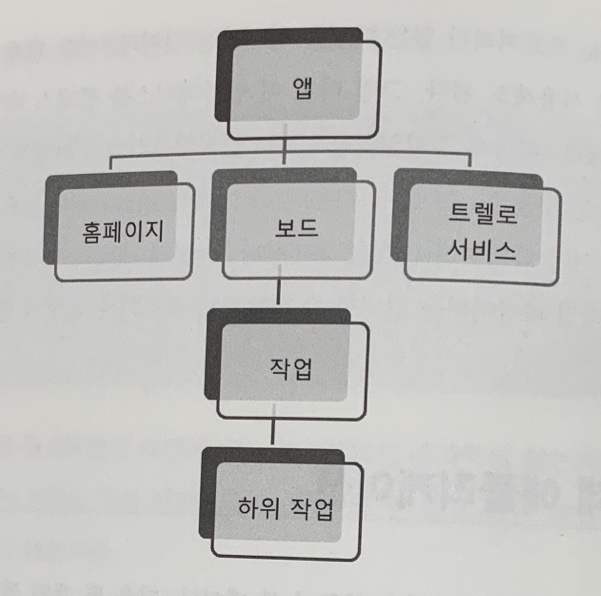
- 홈페이지, 보드, 작업, 하위작업 네가지 컴포넌트
- 홈페이지 클래스와 보드 컴포넌트 사이에 통신을 하는 서비스 클래스
- 작업과 하위 작업은 보드의 자식 컴포넌트
- 홈페이지와 보드 컴포넌트 사이의 통신은 서비스를 사용
- 보드와 작업/하위작업 사이의 통신은 @Input 과 @Output 속성을 사용
- 데이터는 json 파일을 만들어서 가져옴
- 데이터 저장은 하지 않음
코드 설정
ng new SampleTrelloApplication
트렐로 홈페이지
- 사용 가능한 모든 보드를 보여줌
- 보드 이름과 해당 보드의 작업 개수 표시
- 새 보드 추가 기능
- 보드에 작업과 하위 작업 추가
ng g component homepage
모델
- 기본 데이터 구조는 보드와 작업 / 하위작업 으로 구성
- 각각에 해당하는 Board, Task, SubTask 세가지 모델의 Typescript 모듈을 정의
/app/model/subtask.ts
export class SubTask {
	id: string;
	title: string;
}
/app/model/task.ts
import { SubTask } from './subtask';
export class Task {
	id: number;
	title: string;
	subtask: SubTask[];
	taskheaderId: string;
}
/app/model/board.ts
import { Task } from './task';
export class Board {
	id: number;
	title: string;
	task: Task[];
}
홈페이지 컴포넌트
- UI에 표시할 초기 보드와 작업 목록 가져오기
- 새 보드 만들기 이벤트를 처리하여 UI에 새 보드를 추가하기
/app/app.component.html
<header>
  <nav>
    <a class="btn">홈페이지</a>
    <a class="logo">예제 트렐로 애플리케이션</a>
  </nav>
</header>
<div id="content-wrapper">
	<app-homepage></app-homepage>
</div>
보드 서비스
/app/service/trello.service.ts
@Injectable()
export class TrelloService {
	public Boards: Board[];
	constructor(private _http: HttpClient) { }
	public seedData() {
		const temptask: Task = new Task();
		const tempSubTask: SubTask = new SubTask();
		const board: Board = new Board();

		temptask.id = 1;
		temptask.title = 'Hello 작업!!';
		temptask.taskheaderId = '1';

		tempSubTask.id = '1';
		tempSubTask.title = 'Hello 작업 헤더!!';

		temptask.subtask = Array();
		temptask.subtask.push(tempSubTask);

		board.id = 1;
		board.title = 'Hello 보드';
		board.task = new Array();
		board.task.push(temptask);

		this.Boards = new Array();
		this.Boards.push(board);

		return board;
	}
}- TrelloService 클래스에는 seedData라는 하나의 메서드만 있는데 이 메서드는 Task와 SubTask로 채워진 보드 객체를 반환
- Task, SubTask, Board 모듈을 사용하기 위해 꼭 import 해줘야 함
- Injectable 사용하기 위해 @angular/core에서 Injectable을 import
- HttpClient 사용하기 위해 @angular/common/http에서 HttpClient을 import
import { Injectable } from '@angular/core';
import { HttpClient } from '@angular/common/http';
import { Board } from '../model/board';
import { Task } from '../model/task';
import { SubTask } from '../model/subtask';- 서비스 인스턴스 주입
/app/app.module.ts
import { HttpClientModule } from '@angular/common/http';
import { TrelloService } from './service/trello.service';
...
@NgModule({
	...
	imports:[
		...
		HttpClientModule
		...
	],
	providers: [TrelloService],
	...
})
...
홈페이지 - 데이터 초기화
- 홈페이지에 데이터를 채우려면 seedDate 메서드를 호출하려 로컬 Board 객체에 값을 할당하면 됨
-
이를 위해 TrelloService를 호출
- Angular는 컴포넌트의 작업 흐름을 관리하기 위해 생명주기 훅(Lift cycle hook)을 제공
- Angular가 컴포넌트를 만들 때, 컴포넌트를 초기화 할 때, 컴포넌트를 렌더링 할 때, 컴포넌트를 파괴할 때 등 특정 시기에 호출
- 모든 생명주기 훅은 Angular의 core 모듈에서 노출
OnInit
- Angular가 컴포넌트를 초기화하고 데이터 바인딩된 프로퍼티를 표시할 때 호출
- 컴포넌트에 대한 초기화 작업을 하거나 입력 프로퍼티를 설정할 때 호출
- 초기 데이터를 가져오기 위한 서비스 호출
- 컴포넌트 디스플레이에 필요한 복잡한 계산을 하려는 경우
OnDestroy
- Angular 컴포넌트를 파괴하려고 할 때
- 리소스를 정리하고 자동으로 발생하는 타이머나 작업을 중지, 메모리를 정리
- 애플리케이션의 다른 컴포넌트나 다른 부분에 컴포넌트가 삭제된다는 사실을 알려줘서 추가로 필요한 작업을 수행할 수도 있음
OnChange
- 컴포넌트에 바인딩된 프로퍼티에서 변경사항이 생겼을 때 발생
- 프로퍼티가 수정될 때마다 Angular는 OnChange 이벤트를 발생, 파라미터로 템플릿에 바인딩된 프로퍼티를 전달
- 현재 값과 이전 값이 전달되어 변경 사항을 확인하고 논리를 추가 할 수 있음
-
프로퍼티의 값이나 작업 흐름의 변경 사항에 대해 유효성 검사를 처리할 때 사용
- 홈페이지 컴포넌트는 OnInit 를 사용하여 보드에 대한 데이터를 가져와 프로퍼티에 바인딩
- @angular/core 모듈에서 OnInit 모듈을 import 해야 함
/app/homepage/homepage.component.ts
import { Component, OnInit } from '@angular/core';
@Component({
  selector: 'app-homepage',
  templateUrl: './homepage.component.html',
  styleUrls: ['./homepage.component.css']
})
export class HomepageComponent implements OnInit {}- OnInit 인터페이스는 초기화 이벤트가 발생할 때 Angular에 의해 호출되는 ngOnInit 메서드를 하나만 노출, 여기서 필요한 로직을 구현
- 생성자에서 TrelloService를 참조
- seedData 메서드 호출 데이터 가져오기
import { Component, OnInit } from '@angular/core';

import { Board } from '../model/board';
import { SubTask } from '../model/subtask';
import { Task } from '../model/task';
import { TrelloService } from '../service/trello.service';

@Component({
	selector: 'app-homepage',
	templateUrl: './homepage.component.html',
	styleUrls: ['./homepage.component.css']
})
export class HomepageComponent implements OnInit {
	boards: Board[] = Array();
	errorMessage: string;

	constructor(private _trelloService: TrelloService) { }

	ngOnInit() {
		this.boards.push(this._trelloService.seedData());
	}
}
홈페이지 - 템플릿
- 사용 가능한 보드를 표시하는 블록
- 새 보드를 추가할 수 있게 하는 블록
/app/homepage/homepage.component.html
<div class="boards-wrapper">
	<h2>Boards</h2>
	<div id="boards">
		<a class="board" *ngFor="let board of boards">
			<span class="title">{{board?.title}}:
				<label style="font-size: smaller">Total Task: {{board?.task.length}}</label>
			</span>
		</a>
		<a href="#" class="board add-board" (click)="addBoard()">
			<span class="title">Create a new board...</span>
		</a>
	</div>
</div>
홈페이지 - 새로운 보드 추가
- 보드를 추가하면 새 보드 객체를 생성, id와 title을 할당, 전역 Boards 객체에 객체를 추가
/app/homepage/homepage.component.ts
import { Component, OnInit } from '@angular/core';

import { Board } from '../model/board';
import { SubTask } from '../model/subtask';
import { Task } from '../model/task';
import { TrelloService } from '../service/trello.service';

@Component({
	selector: 'app-homepage',
	templateUrl: './homepage.component.html',
	styleUrls: ['./homepage.component.css']
})
export class HomepageComponent implements OnInit {
	boards: Board[] = Array();
	errorMessage: string;

	constructor(private _trelloService: TrelloService) { }

	ngOnInit() {
		this.boards.push(this._trelloService.seedData());
	}

	public addBoard() {
		console.log('Adding new board');
		const newBoard: Board = new Board();
		newBoard.id = this.boards.length + 1;
		newBoard.task = Array();
		newBoard.title = 'New Board';
		this.boards.push(newBoard);
		console.log('new board added');
	}
}
트렐로 - 보드 컴포넌트
- Angular 라우팅을 사용하여 해당 보드 페이지로 이동
- 라우팅 시 파라미터를 통해 어떤 보드를 선택했는지 전달
- 보드 페이지에서 각각의 작업과 하위 작업 가져오기, 트렐로 서비스를 공유함으로 구현
- 데이터와 함께 작업과 하위 작업을 호면에 표시, Task 와 SubTask 컴포넌트를 만들고 필요한 데이터 전달
- Task 와 SubTask 사이의 통신은 @Input 와 @Output 프로퍼티로 처리
ng g component board
라우팅
/app/app.module.ts
import { RouterModule, Routes } from '@angular/router';
...
const appRoutes: Routes = [
	{ path: 'board/:id', component: BoardComponent, pathMatch: 'full' },

	{ path: '', component: HomepageComponent },
];
...
@NgModule({
	...
	imports:[
		...
		RouterModule.forRoot(appRoutes)
		...
	],
	...
})
...
/app/homepage/homepage.component.html
...
<a class="board" *ngFor="let board of boards" [routerLink]="['/board', board.id]">
...
/app/app.component.html
<header>
  <nav>
    <a class="btn">홈페이지</a>
    <a class="logo">예제 트렐로 애플리케이션</a>
  </nav>
</header>
<div id="content-wrapper">
	<router-outlet></router-outlet>
</div>
보드 컴포넌트 라우팅
app/board/board.component.ts
- router 모듈 import
import { Params, ActivatedRoute } from '@angular/router';- 라우터 서비스 주입
constructor(private _route: ActivatedRoute) { }- 생성자에 트렐로 서비스 참조
import { TrelloService } from '../service/trello.service';
constructor(private _route: ActivatedRoute, private _trelloService: TrelloService) { }- OnInit 메서드를 사용하여 보드 템플릿의 데이터 초기화
ngOnInit() {
	const boardId = this._route.snapshot.params['id'];
}
보드 컴포넌트 - 데이터 추출
- 트렐로 서비스를 사용하여 다음 코드와 같이 id를 기반으로 보드를 필터링
import { Board } from '../model/board';
...
export class BoardComponent implements OnInit {
	board: Board = new Board();
	constructor(private _route: ActivatedRoute, private _trelloService: TrelloService) { }

	ngOnInit() {
		const boardId = this._route.snapshot.params.id;
		console.log(boardId);
		this.board = this._trelloService.Boards.find(x => x.id == boardId);
	}
}- 트렐로 서비스를 사용하여 모든 레코드를 가져온 다음
- 전달된 id를 기반으로 보드를 가져오도록 필터링
- 홈페이지 컴포넌트와 보드 컴포넌트는 같은 트렐로 서비스를 사용하여 데이터를 공유
보드 컴포넌트 - 자식 컴포넌트에 데이터 전달하기
ng g component task
ng g component subtask
- 보드 컴포넌트는 선택한 id를 기반으로 데이터를 구했고 이제 Task와 SubTask 컴포넌트를 사용하여 데이터를 채우기
- 보드 컴포넌트 -> 작업 컴포넌트 -> 하위작업 컴포넌트 의 구조로 데이터가 전달됨
- 모든 데이터를 보드 컴포넌트에 보관할 수도 있으나 데이터가 커질수록 관리가 어려워짐
- 항상 “단일 책임 원칙”을 따르는 것이 좋음
@Input을 사용해 자식 컴포넌트에 데이터 전달
- @Input 데코레이터 : 하위 컴포넌트가 부모 컴포넌트에게 프로퍼티를 노출할 수 있도록 함
- 모든 프로퍼티가 대상이 됨
- TaskComponent에는 외부에 노출할 task 프로퍼티가 있음
- BoardComponent는 특정 작업을 task 프로퍼티에 지정하여 작업 템플릿을 채우는데 사용
/app/task/task.component.ts
import { Component, OnInit, Input } from '@angular/core';
import { Task } from '../model/task';
import { SubTask } from '../model/subtask';

@Component({
	selector: 'app-task',
	templateUrl: './task.component.html',
	styleUrls: ['./task.component.css']
})
export class TaskComponent implements OnInit {
	@Input()
	task: Task; // Task 컴포넌트의 task 프로퍼티를 노출 할 것임을 표시
	@Input()
	subTasks: SubTask[];
	constructor() { }
	ngOnInit() {
	}
}- 보드 컴포넌트는 프로퍼티 바인딩을 사용하여 작업과 하위 작업 프로퍼티를 설정하는데 필요한 데이터를 전달할 수 있음
- 프로퍼티 바인딩은 대괄호 안에 바인딩 대상을 설정하면 됨
/app/board/board.component.html
<div *ngFor="let task of board.task" class="sortable-task">
  <app-task [task]="task" [subTasks]="task.subtask"></app-task>
</div>- 보드 컴포넌트의 작업 또는 하위 작업 프로퍼티의 값이 변경될때마다 해당 작업 컴포넌트에 반영됨
자식 컴포넌트의 데이터를 부모 데이터로 전달하기
- @Output 데코레이터를 사용하여 자식이 부모에게 데이터를 다시 전달
/app/task/task.component.ts
@Output()
public onAddsubTask: EventEmitter<SubTask>;- EventEmitter는 제네릭 타입이며 사용할 때 사용할 타입을 지정
- 출력이벤트를 사용하려면 다음과 같이 괄호를 사용하여 상위 컴포넌트에 이벤트를 바인딩
/app/board/board.component.html
(onAddsubTask)="addsubTask($event)"- 자식 컴포넌트가 부모 컴포넌트에게 onAddsubTask 이벤트를 방출할 수 있음을 알려줌
-
해당 이벤트가 발생하면 addsubTask라는 부모 컴포넌트의 메서드를 호출
- 자식 컴포넌트에서 이벤트를 발생시키려면 작업 컴포넌트의 addsubTask에서 emit 메서드를 호출
/app/task/task.component.ts
this.onAddsubTask.emit(newsubTask);- Angular의 모든 이벤트 방출기는 emit 함수를 제공
- 자식 컴포넌트에서 부모 컴포넌트로 이벤트를 전달해야 함을 알려줌
- onAddsubTask 이벤트 수신 시 호출되는 코드로 전달된 이벤트 정보를 출력
addsubTask(event){
	console.log('이벤트 발생');
	console.log(event);
}